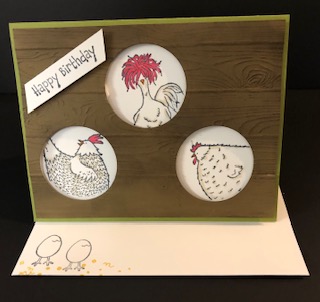
Hey Birthday Chick
Supplies:
- Old Olive Cardstock (#100702) - 8 1/2" X 5 1/2" scored at 4 1/4"
- White Cardstock (#159276) - 4" X 4 1/4" (X2); 1/2" scrap for greeting
- Soft Suede (#115318) - 4" X 5 1/3"
- Copy Paper - 4" X 5 1/4"
- Layering Circles (#151770)
- Pinewood Plank Embossing Folder (3152320)
Ink:
- Early Expresso (#147114); Black Memento (#132708)
- Stampin Blends: Pumpkin Pie (#154897); Crumb Cake (#154882); Real Red (#154899)
Instructions:
- Take you piece of copy paper and the 3rd smallest layering circle and your Emboss & Cut machine and place the circle die in the top middle and cut your circle and then do the same on the bottom left and then the bottom right. Make sure you leave enough room for around the edges for dimensionals.
- Put the copy paper on top of the Soft Suede piece and it should be the same. Using a pencil draw around each circle so you will be able to see where the circles are to be cut out. Now you are going to ink and emboss the Soft Suede.
- Using the inside of the top of your embossing folder and your Early Expresso Ink and run the ink pad over the top side of the embossing folder. Place your soft suede piece inside the folder and then run through the Cut & Emboss machine.
- Use one of your white 4" X 5 1/4" piece and put your piece of copy paper with the holes on top of your white piece and using a bit of washi tape on the 4 corners tape the 2 together so they do not move. In each hole stamp the head of each chicken. Remove the copy paper and then color the chicks in where needed.
- While you are doing the stamping you might as well stamp the inside with your word and any other stamp set you would like to use and also do your envelope and also do the coloring. Now you are ready to assemble the card.
- Attach the Soft Suede piece to the white piece you did the stamping on using dimensionals, you will need quite a few. Now you can attach this to the front of the card just using liquid glue, then you can glue your piece inside the card and attach your greeting to the outside of the card.
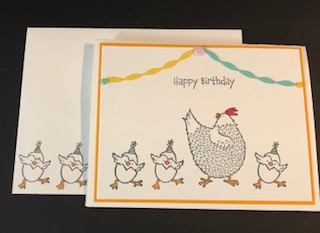
Today we are doing a Birthday Card using the Hey Chick and the Happy Birthday Chick Bundle!
Supplies:
- Hey Chick Bundle (#158628)
- Hey Birthday Chick (#158631)
- White Cardstock (#159229) - 8 1/2" X 5 1/2"; 5 1/8" X 3 7/8"
- Mango Melody (#146989) - 5 1/4" X 4"; scrap of Mango Melody about 3 1/2"
- Coastal Cabana (#131297) - scrap about 3 1/2
- Playing with Patterns Resin Dots (#152467)
- Mini Cut and Emboss Machine (#150673)
Ink:
- Memento Black
- Blends or Markers - Real Red (#154899); Pumpkin Pie (#154897);Bermuda Bay (#154878); Daffodil Delight (#154883); Soft Suede (#154906); and Crumb Cake (#154882)
Add comment
When you shop with me online at Stampin' Up!, be sure to use my current HOST CODE:
AH464HSP
AH464HSP


Upcoming Classes & Events
| I don't have any events on my calendar at this time. Please check back again. |
Share This on Social Media

Newsletter Signup
Project Inspirations
.jpg)
.jpg)
.jpg)
.jpg)
.jpg)
.jpg)
.jpg)
.jpg)
.jpg)
.jpg)
.jpg)
.jpg)
.jpg)
.jpg)
.jpg)
.jpg)
.jpg)
.jpg)
.jpg)
.jpg)
.jpg)
.jpg)
.jpg)
.jpg)
.jpg)
.jpg)
.jpg)
.jpg)
.jpg)
.jpg)
.jpg)
.jpg)
.jpg)
.jpg)
.jpg)
.jpg)
.jpg)
.jpg)
.jpg)
.jpg)
.jpg)
.jpg)
.jpg)
.jpg)
.jpg)
.jpg)
.jpg)
.jpg)
.jpg)
.jpg)
.jpg)
.jpg)
.jpg)
.jpg)
.jpg)
.jpg)
.jpg)
.jpg)
.jpg)
.jpg)
.jpg)
.jpg)
.jpg)
.jpg)
.jpg)
.jpg)
.jpg)
.jpg)
.jpg)
.jpg)
.jpg)
.jpg)
.jpg)
.jpg)
.jpg)
.jpg)
.jpg)
.jpg)
.jpg)
.jpg)
.jpg)
.jpg)
.jpg)
.jpg)
.jpg)
.jpg)
.jpg)
.jpg)
.jpg)
.jpg)
.jpg)
.jpg)
.jpg)
.jpg)
.jpg)
.jpg)
.jpg)
.jpg)
.jpg)
.jpg)
.jpg)
.jpg)
.jpg)
.jpg)
.jpg)
.jpg)
.jpg)
.jpg)
.jpg)
.jpg)
.jpg)
.jpg)
.jpg)
.jpg)
.jpg)
.jpg)
.jpg)
.jpg)
.jpg)
.jpg)
.jpg)
.jpg)
.jpg)
.jpg)
.jpg)
.jpg)
.jpg)
.jpg)
.jpg)
.jpg)
.jpg)
.jpg)
.jpg)
.jpg)
.jpg)
.jpg)
.jpg)
.jpg)
.jpg)
.jpg)
.jpg)
.jpg)
.jpg)
.jpg)
.jpg)
.jpg)
.jpg)
.jpg)
.jpg)
.jpg)
.jpg)
.jpg)
.jpg)
.jpg)
.jpg)
.jpg)
.jpg)
.jpg)
.jpg)
.jpg)
.jpg)
.jpg)
.jpg)
.jpg)
.jpg)
.jpg)
.jpg)
.jpg)
.jpg)
.jpg)
.jpg)
.jpg)
.jpg)
.jpg)
.jpg)
.jpg)
.jpg)
.jpg)
.jpg)
.jpg)
.jpg)
.jpg)
.jpg)
.jpg)
.jpg)
.jpg)
.jpg)
.jpg)
.jpg)
.jpg)
.jpg)
.jpg)
.jpg)
.jpg)
.jpg)
.jpg)
.jpg)
.jpg)
.jpg)
.jpg)
.jpg)
.jpg)
.jpg)
.jpg)
.jpg)
.jpg)
.jpg)
Latest Blog Posts
Paper Pumpkin is the perfect monthly crafting kit for Everyone! No special skills or tools required. Each month a fully complete project kit arrives in a delightful box filled with stamps, ink, and paper—everything cut and ready to go so you can skip right to the fun.
Tell Me More Sign Me Up!
Tell Me More Sign Me Up!