Birthday Wishes Card: Whale Done stamp set and Designer Series Paper with the Shark Frenzy Bundle
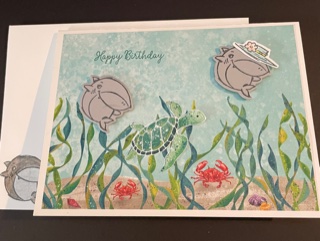
Birthday Wishes
White Cardstock (#159229) - 5 1/2" X 8 1/2" scored at 4 1/4"; scrap for stamping hat
Smoky Slate cardstock (#131202) - 3" X 3" scrap piece for stamping
Whale of a Time Stamp (#152470)
Whale of a time DSP (#152460) - 5 1/4" X 4"; 2 1/4" X 6"; 3/4" X 4"
Shark Frenzy Bundle (#156213)
Add new comment
Hey Birthday Chick
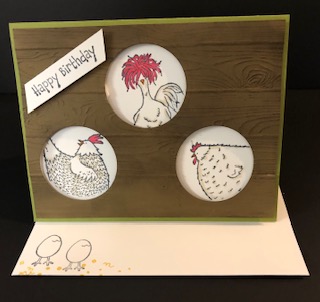
Supplies:
- Old Olive Cardstock (#100702) - 8 1/2" X 5 1/2" scored at 4 1/4"
- White Cardstock (#159276) - 4" X 4 1/4" (X2); 1/2" scrap for greeting
- Soft Suede (#115318) - 4" X 5 1/3"
- Copy Paper - 4" X 5 1/4"
- Layering Circles (#151770)
- Pinewood Plank Embossing Folder (3152320)
Ink:
- Early Expresso (#147114); Black Memento (#132708)
- Stampin Blends: Pumpkin Pie (#154897); Crumb Cake (#154882); Real Red (#154899)
Instructions:
- Take you piece of copy paper and the 3rd smallest layering circle and your Emboss & Cut machine and place the circle die in the top middle and cut your circle and then do the same on the bottom left and then the bottom right. Make sure you leave enough room for around the edges for dimensionals.
- Put the copy paper on top of the Soft Suede piece and it should be the same. Using a pencil draw around each circle so you will be able to see where the circles are to be cut out. Now you are going to ink and emboss the Soft Suede.
- Using the inside of the top of your embossing folder and your Early Expresso Ink and run the ink pad over the top side of the embossing folder. Place your soft suede piece inside the folder and then run through the Cut & Emboss machine.
- Use one of your white 4" X 5 1/4" piece and put your piece of copy paper with the holes on top of your white piece and using a bit of washi tape on the 4 corners tape the 2 together so they do not move. In each hole stamp the head of each chicken. Remove the copy paper and then color the chicks in where needed.
- While you are doing the stamping you might as well stamp the inside with your word and any other stamp set you would like to use and also do your envelope and also do the coloring. Now you are ready to assemble the card.
- Attach the Soft Suede piece to the white piece you did the stamping on using dimensionals, you will need quite a few. Now you can attach this to the front of the card just using liquid glue, then you can glue your piece inside the card and attach your greeting to the outside of the card.
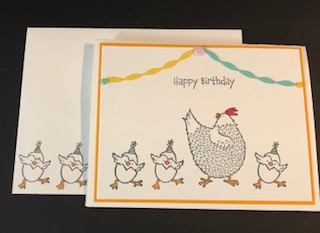
Today we are doing a Birthday Card using the Hey Chick and the Happy Birthday Chick Bundle!
Supplies:
- Hey Chick Bundle (#158628)
- Hey Birthday Chick (#158631)
- White Cardstock (#159229) - 8 1/2" X 5 1/2"; 5 1/8" X 3 7/8"
- Mango Melody (#146989) - 5 1/4" X 4"; scrap of Mango Melody about 3 1/2"
- Coastal Cabana (#131297) - scrap about 3 1/2
- Playing with Patterns Resin Dots (#152467)
- Mini Cut and Emboss Machine (#150673)
Ink:
- Memento Black
- Blends or Markers - Real Red (#154899); Pumpkin Pie (#154897);Bermuda Bay (#154878); Daffodil Delight (#154883); Soft Suede (#154906); and Crumb Cake (#154882)
Garden Wishes Card

Garden Wishes Bundle
 Poinsettia Petals Christmas Cards


I am going to show you 4 cards done in the same design but just using a couple of different products.
- Supplies:
- White card stock - 8 1/2" X 5 1/2"
- Real Red card stock and Ink- 3 3/4" X 3 3/4" (x2)
- Garden Green card stock and Ink (Scrap for 3 leaves)
- Crushed Curry card stock (scrap for dots for middle of flowers)
- Silver & Gold Foil Strip - 1/2"" X 5 1/2"
- Designer Series Paper - 2" X 5 1/2"
- Plush Poinetttia Specialty Paper - 3 3/4" X 3 3/4"
- Beaded Pearls
- Winter Snow Embossing Folder
- Versamark
- Silver, Gold & White embossing Powder
- Heat Tool
Directions:
- Using the 3 3/4" X 3 3/4" (2 pieces) of Real Red card stock stamp 2 of the poinsettias, I did 2 different sizes using your Real Red Ink then cut them you using the dies. The white card you might want to fussy cut the poinsettia and the leaves out by hand and that way you are able to save some.
- Use the scrap of Garden Green for the leaves, stamp them using the Garden Green ink. Then cut them out.
- Cut out the centers for the flowers using the Crushed curry.
- Now you can start assembling the cards. Attach the 1/2" gold or silver strips onto the designer series paper or the White 2" X 5 1/2" after you have embossed this using the Winter Snow Embossing folder.
- Attach the 2 flowers together, I put the smaller one on the bottom and attached the bigger one using glue dots or adhesive, then put the small Crushed Curry dots in the middle of the flower.
- Attach the flower t then add your leaves to the card using glue dots.
- The Merry Christmas is stamped in Garden Green on the card that you are not doing any embossing on.
- On the other 3 cards you will want to do the embossing with the Gold and Silver before you begin to assemble the cards.
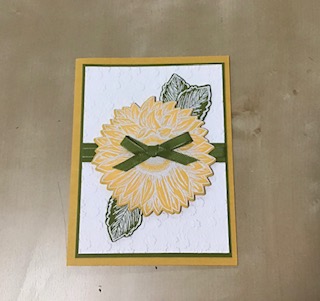
Celebrate Sunflowers Bleaching Technique - July Blog
Today I want to show you a technique that was around a while ago, and seems to be making a bit of a comeback. This method is a little easier to do and results in a unique look when complete.






.jpg)
.jpg)
.jpg)
.jpg)
.jpg)
.jpg)
.jpg)
.jpg)
.jpg)
.jpg)
.jpg)
.jpg)
.jpg)
.jpg)
.jpg)
.jpg)
.jpg)
.jpg)
.jpg)
.jpg)
.jpg)
.jpg)
.jpg)
.jpg)
.jpg)
.jpg)
.jpg)
.jpg)
.jpg)
.jpg)
.jpg)
.jpg)
.jpg)
.jpg)
.jpg)
.jpg)
.jpg)
.jpg)
.jpg)
.jpg)
.jpg)
.jpg)
.jpg)
.jpg)
.jpg)
.jpg)
.jpg)
.jpg)
.jpg)
.jpg)
.jpg)
.jpg)
.jpg)
.jpg)
.jpg)
.jpg)
.jpg)
.jpg)
.jpg)
.jpg)
.jpg)
.jpg)
.jpg)
.jpg)
.jpg)
.jpg)
.jpg)
.jpg)
.jpg)
.jpg)
.jpg)
.jpg)
.jpg)
.jpg)
.jpg)
.jpg)
.jpg)
.jpg)
.jpg)
.jpg)
.jpg)
.jpg)
.jpg)
.jpg)
.jpg)
.jpg)
.jpg)
.jpg)
.jpg)
.jpg)
.jpg)
.jpg)
.jpg)
.jpg)
.jpg)
.jpg)
.jpg)
.jpg)
.jpg)
.jpg)
.jpg)
.jpg)
.jpg)
.jpg)
.jpg)
.jpg)
.jpg)
.jpg)
.jpg)
.jpg)
.jpg)
.jpg)
.jpg)
.jpg)
.jpg)
.jpg)
.jpg)
.jpg)
.jpg)
.jpg)
.jpg)
.jpg)
.jpg)
.jpg)
.jpg)
.jpg)
.jpg)
.jpg)
.jpg)
.jpg)
.jpg)
.jpg)
.jpg)
.jpg)
.jpg)
.jpg)
.jpg)
.jpg)
.jpg)
.jpg)
.jpg)
.jpg)
.jpg)
.jpg)
.jpg)
.jpg)
.jpg)
.jpg)
.jpg)
.jpg)
.jpg)
.jpg)
.jpg)
.jpg)
.jpg)
.jpg)
.jpg)
.jpg)
.jpg)
.jpg)
.jpg)
.jpg)
.jpg)
.jpg)
.jpg)
.jpg)
.jpg)
.jpg)
.jpg)
.jpg)
.jpg)
.jpg)
.jpg)
.jpg)
.jpg)
.jpg)
.jpg)
.jpg)
.jpg)
.jpg)
.jpg)
.jpg)
.jpg)
.jpg)
.jpg)
.jpg)
.jpg)
.jpg)
.jpg)
.jpg)
.jpg)
.jpg)
.jpg)
.jpg)
.jpg)
.jpg)
.jpg)
.jpg)
.jpg)
.jpg)
.jpg)
.jpg)
.jpg)
.jpg)
.jpg)
.jpg)
.jpg)
