The Gentlemen Crafters Design Team - May Inspiration Blog Hop!

Welcome to The Gentlemen Crafters Design Team Inspiration Hop!
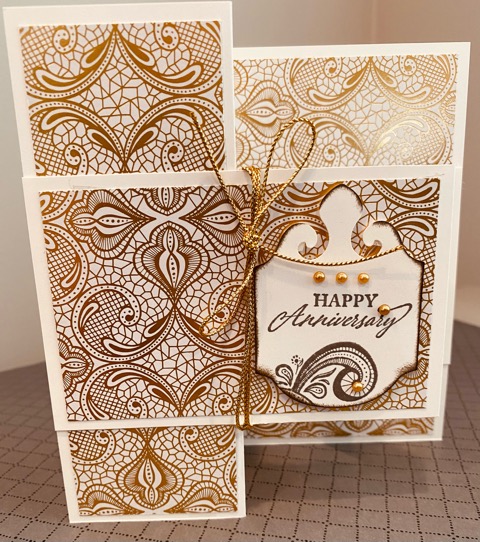
It is quite amazing how quickly time passes and here I am again with the other gents sharing one of our projects! There are so many amazing products in our newest catalog and it was hard to pick which set to feature. Here in the USA it is Spring, and a popular time for Weddings, which lead to Anniversaries! In fact several friends and family will be celebrating soon, so I decided to feature the "Elegantly Said" bundle this month using a Double Z fold card design.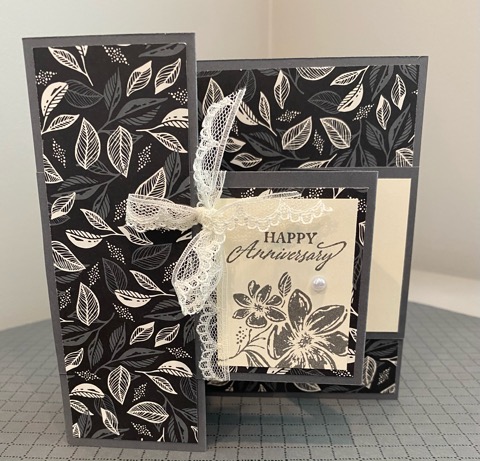
If you haven't made a 'Z' or a "Double-Z" yet, then you're in a treat and a card design that is both impressive and versatile to use for any occasion. If you look closely at the photos, notice on the Gold/White card the inside "Z" lays on top of the front panel. For the Grey/Vanilla card the inside "Z" tucks under the front panel. The only other difference is the use of the "Elegant Tag" punch* on the Gold/White card. Don't you love options? A video tutorial is at the end of this post. Okay, let's get to it!
Note: card 1 uses Basic White Card Stock, card 2 uses Basic Gray, and Very Vanilla Card Stock
Card Base outside "Z"
1. 8 1/2" x 11" Card Stock, on 11" side, cut in half @ 5 1/2", score on 8 1/2" side at 2 1/8", 4 1/4" on one piece.
Inner "Z"
2. On the second 5 1/2" x 8 1/2" piece, cut in half on the 5 1/2" side @ 2 3/4" which gives you two equal pieces. Score one on the 8 1/2" side @ 2 1/8", 4 1/4"
I used Simply Elegant Specialty DSP for the accent paper.
Base Z
3. Be mindful of pattern and placement if you like everything going in the same direction.
Cut 1 of each 5 1/4" x 1 7/8", 5 1/4 x 4"
Inner "Z"
4. Cut 1 of each 2 1/2" x 4, 1 7/8" x 2 1/2"; from Basic White CS, cut one using punch*, or cut an extra 1 7/8" x 2 1/2"
Assembly:
5. Fold larger base in half, burnish fold edge with bone fold, fold left side back and burnish making a "Z"
6. Fold Inner "Z", looking at photo, fold right edge of 4" segment down, and the next segment back on itself. Burnish edges with bone folder
7. Looking at photo, adhere DSP to both of the "Z". note on the basic gray attach the inner z to the base before adhering the 5 1/4" x 1 7/8" DSP. (this is the tuck noted above)
I hope you will enjoy making this card design!
God Bless!
Tony
Please continue the TGCDT Blog Hop by clicking on one of the names below:

Read More Great Posts In My Blog


Current Host Code
CODEGOESHERE
Upcoming Classes & Events
| Monthly Card Class 12 May 2024 02:00PM - 04:00PM |

Share This on Social Media
Latest Blog Posts
Newsletter Signup
Project Inspirations
.jpg)
.jpg)
.jpg)
.jpg)
.jpg)
.jpg)
.jpg)
.jpg)
.jpg)
.jpg)
.jpg)
.jpg)
.jpg)
.jpg)
.jpg)
.jpg)
.jpg)
.jpg)
.jpg)
.jpg)
.jpg)
.jpg)
.jpg)
.jpg)
.jpg)
.jpg)
.jpg)
.jpg)
.jpg)
.jpg)
.jpg)
.jpg)
.jpg)
.jpg)
.jpg)
.jpg)
.jpg)
.jpg)
.jpg)
.jpg)
.jpg)
.jpg)
.jpg)
.jpg)
.jpg)
.jpg)
.jpg)
.jpg)
.jpg)
.jpg)
.jpg)
.jpg)
.jpg)
.jpg)
.jpg)
.jpg)
.jpg)
.jpg)
.jpg)
.jpg)
.jpg)
.jpg)
.jpg)
.jpg)
.jpg)
.jpg)
.jpg)
.jpg)
.jpg)
.jpg)
.jpg)
.jpg)
.jpg)
.jpg)
.jpg)
.jpg)
.jpg)
.jpg)
.jpg)
.jpg)
.jpg)
.jpg)
.jpg)
.jpg)
.jpg)
.jpg)
.jpg)
.jpg)
.jpg)
.jpg)
.jpg)
.jpg)
.jpg)
.jpg)
.jpg)
.jpg)
.jpg)
.jpg)
.jpg)
.jpg)
.jpg)
.jpg)
.jpg)
.jpg)
.jpg)
.jpg)
.jpg)
.jpg)
.jpg)
.jpg)
.jpg)
.jpg)
.jpg)
.jpg)
.jpg)
.jpg)
.jpg)
.jpg)
.jpg)
.jpg)
.jpg)
.jpg)
.jpg)
.jpg)
.jpg)
.jpg)
.jpg)
.jpg)
.jpg)
.jpg)
.jpg)
.jpg)
.jpg)
.jpg)
.jpg)
.jpg)
.jpg)
.jpg)
.jpg)
.jpg)
.jpg)
.jpg)
.jpg)
.jpg)
.jpg)
.jpg)
.jpg)
.jpg)
.jpg)
.jpg)
.jpg)
.jpg)
.jpg)
.jpg)
.jpg)
.jpg)
.jpg)
.jpg)
.jpg)
.jpg)
.jpg)
.jpg)
.jpg)
.jpg)
.jpg)
.jpg)
.jpg)
.jpg)
.jpg)
.jpg)
.jpg)
.jpg)
.jpg)
.jpg)
.jpg)
.jpg)
.jpg)
.jpg)
.jpg)
.jpg)
.jpg)
.jpg)
.jpg)
.jpg)
.jpg)
.jpg)
.jpg)
.jpg)
.jpg)
.jpg)
.jpg)
.jpg)
.jpg)
.jpg)
.jpg)
.jpg)
.jpg)
.jpg)
.jpg)
.jpg)
.jpg)
.jpg)
.jpg)
.jpg)
.jpg)
.jpg)
.jpg)
Paper Pumpkin
TELL ME MORE SIGN ME UP!
Comments
Finally a Z- fold video I can understand! You did a great job of showing options for placement and really got me thinking of some other options too!
Thanks for sharing
Sue
I really like your card - I love this great designer paper. Thank you for the inspiration.
Many greetings from Leipzig. Rene